| General -> Accessories. | Bars and grips - Raask Rear Sets - Review & ... | | | | Categories : |
|  | Topic : Horn Replacement with Front Dresser Bars |  |
| | | PapaSmurfMC | | Chaac |  |  | | Reg. Date | : | 03/10/2013 | | Posts | : | 871 | | Location | : | Philadelphia, Pennsylvania, United States |
|
| | Posted : 10 Jul 2014 - 02:06 Post title : Horn Replacement with Front Dresser Bars | | | I don't have a lot of occassion to use my horn but last week when a giant SUV decided to merge into my lane without looking while I was passing and I used the horn (and swerved away, had plentry of room), it worked well enough but made a humiliating "meep meep", like the cartoon Roadrunner.
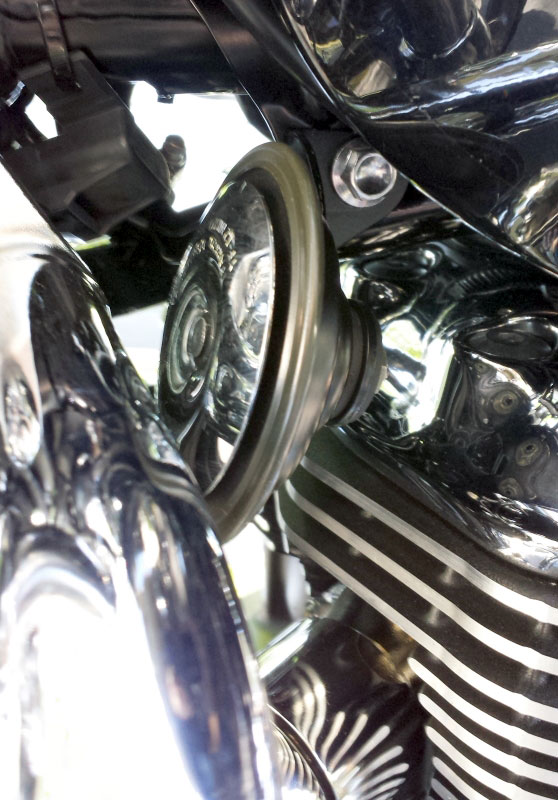
A nice quality disc horn comes with the Triumph front "dresser bars" because the stock horn won't fit in the space left by the clutch-side bar. I've seen some people say they made the stock horn fit with some persuation but short of fabricating an all new bracket, I didn't see a good way to do that and didn't want to destroy the stock bracket. I always try to make changes that are reversible back to stock.
I also wanted a loud horn but didn't feel the need for an air horn and really didn't want to relocate the horn from the stock location and add a relay to handle the extra current. When I came across the Fiamm Freeway Blaster, it looked like just the thing and was cheap enough, about $15.00 shipped, that I wasn't concerned with maybe destroying it if mounting went pear shaped. It also only draws 6 amps and being on a 10 amp fuse, no relay is needed.
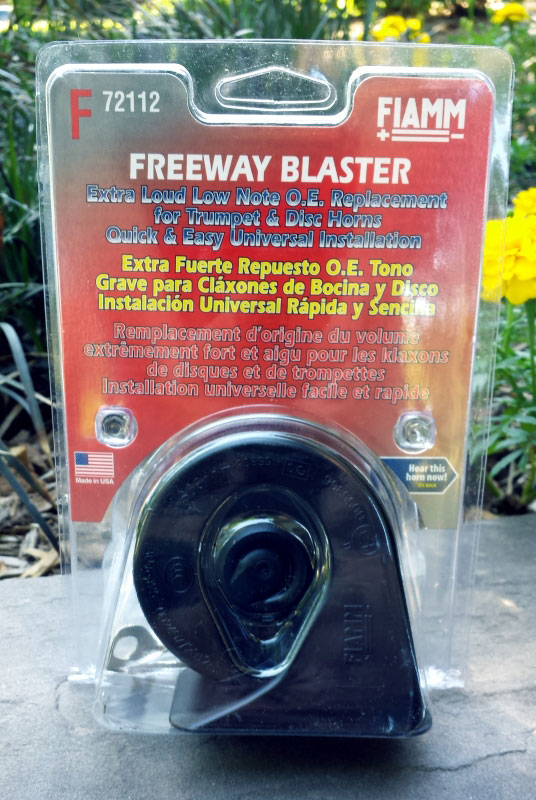
It claims to be 139dB. Not hardly but at least as good or slightly better than the stock horn, volume-wise, and a much lower pitch so it goes "honk" instead of "meep".
The shell of the horn is black plastic but the chassis is a bright chrome-like plated metal and a visual eyesore. I painted mine black (after masking off all plastic and all electrical terminals).
Another problem I ran into was, before I realized that the horn achieves it's volume from the resonance of the plastic shell, is that the horn must not make physical contact with anything but the mounting bracket via the single integrated mounting bolt. If anything touches the plastic shell, it can no longer freely resonate and you get just a muffled moan (which is also what came from me the first time I mounted the horn up against the dresser bar).
The following mounting technique requires that you've got the disc horn supplied with the front dresser bars because we're re-purposing its mounting bracket. The stock horn uses a flat bracket and the disc horn uses a right-angle bracket.
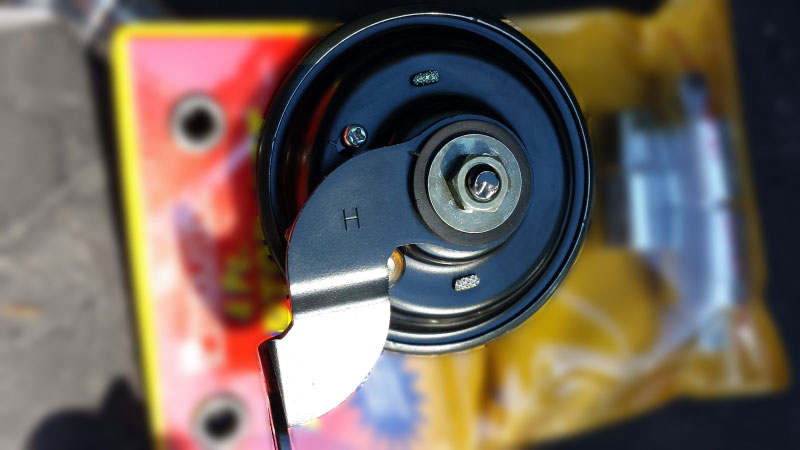
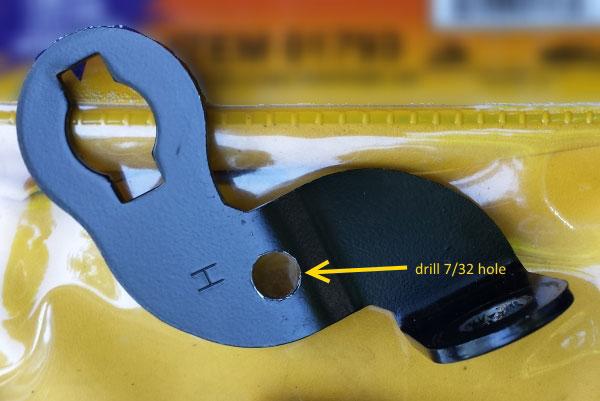
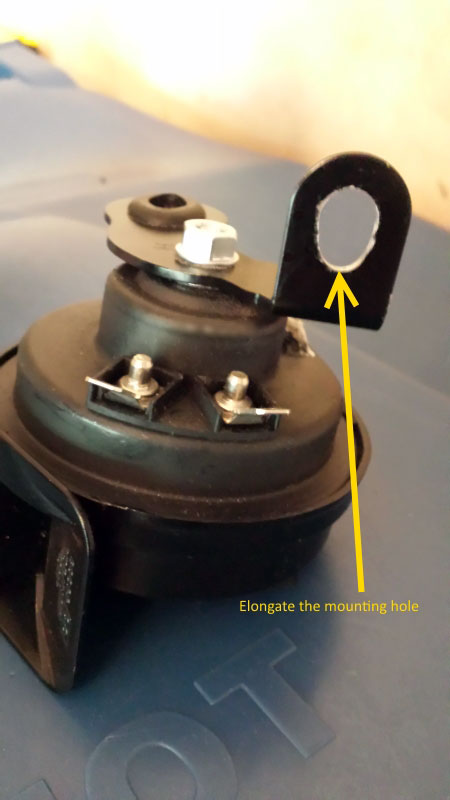
Remove the bracket from the disc horn and drill a 7/32" hole in the bracket as indicated in the photo, just at the bend in the bracket and centered.
To get clearance away from the dresser bar, the bracket's mounting hole (to the Bird) must be elongated to allow the horn to slide backward, away from the bar. A Dremel or a rat-tail file does the job.
If you're going to paint the metal, mask off all electrical contacts AND all plastic.
Attach the horn mounting bolt through the drilled bracket per the photo but leave the nut loose for now.
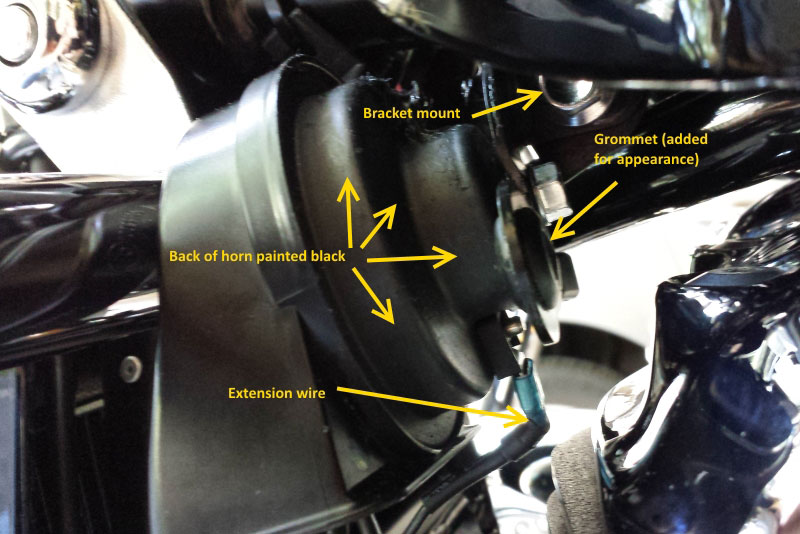
In order to position the mounted horn for maximum clearance, one of the electical connections will be out of reach of the horn cable. Make a simple 3-4 inch long extension, as in the photo and connect to the out-of-reach horn contact and then in-line with one of the horn wires. If you've got dielectric grease, give all contacts a light coating. Test the horn before bolting the bracket to the bird so you know what it should sound like before tightening bolts and nuts.

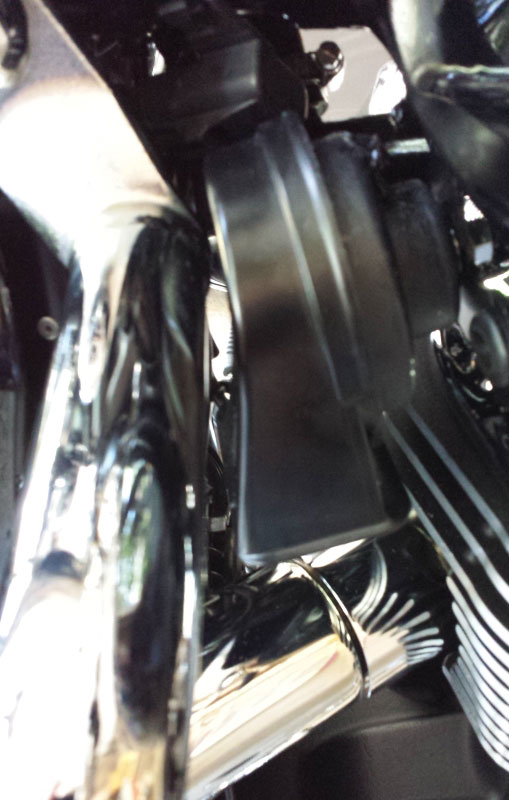
Bolt the horn bracket back on the Bird, sliding it as far to the right as it will go and tighten. Now rotate the horn with the open end pointed down (you don't want it to fill with water) until there is some slack in the horn wires and tighten the nut. Test again; if the sound is muffled, something is making contact with the plastic horn shell.
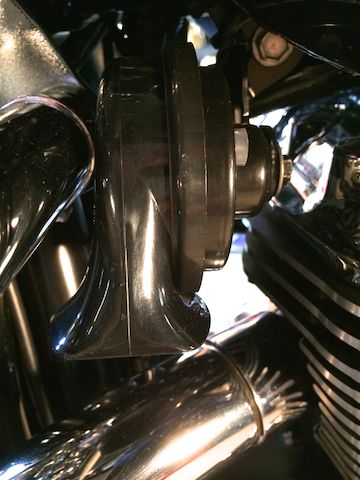
All done! Honk away.
Ride safe,
PapaSmurfMC
| 2013 Blue Marble Haze Thunderbird 1600 ABS
2009 Black Bonneville A1 ("Mag")
Buncha farkles
| | Post edited by PapaSmurfMC on 10 Jul 2014 - 02:08 |
|
| | | IngerMan | | Set | |  | | Reg. Date | : | 19/02/2014 | | Posts | : | 217 | | Location | : | Buffalo, NY, United States |
|
| | Posted : 10 Jul 2014 - 10:47 Post title : Re: Horn Replacement with Front Dresser Bars (Re: PapaSmurfMC) | | | You can take the stock horn with the new road runner bracket and accomplish the same thing with no drilling no new wires. It was a 10 minute job to take the stock horn and mount it. I only needed to lightly bend the bracket a little with my hand to keep it perpendicular before tightening the bolt on the frame.
I just snapped the picture below and it almost looks like your new Horn 
| 2012 Triumph 1600, MeerKat Crossover, Long Tor's, Performance Filter, Pacific Blue and White.
Kip
|
|
| | | tStorm | | Set | |  | | Reg. Date | : | 13/04/2011 | | Posts | : | 23 | | Location | : | United States |
|
| | Posted : 10 Jul 2014 - 12:30 Post title : Re: Horn Replacement with Front Dresser Bars (Re: IngerMan) | | | IngerMan -- what "new road runner bracket"? -- tStorm
|
|
| | | IngerMan | | Set | | | | Reg. Date | : | 19/02/2014 | | Posts | : | 217 | | Location | : | Buffalo, NY, United States |
|
| | Posted : 10 Jul 2014 - 17:12 Post title : Re: Horn Replacement with Front Dresser Bars (Re: tStorm) | | |
tStorm wrote:
IngerMan -- what "new road runner bracket"? -- tStorm |
|
When you purchase the dresser bars it comes with the crap chrome horn and a new style mounting bracket (AKA road runner bracket). If you take the old stock horn and mount it to the new bracket that came with the kit your in business, mounting it just like the picture depicts. You need to bend the terminal strip tabs (the wires plug onto) on the horn straight out so the current wires reach and lightly bend the bracket so the horn is straight.
| 2012 Triumph 1600, MeerKat Crossover, Long Tor's, Performance Filter, Pacific Blue and White.
Kip
|
|
| | | PapaSmurfMC | | Chaac | | | | Reg. Date | : | 03/10/2013 | | Posts | : | 871 | | Location | : | Philadelphia, Pennsylvania, United States |
|
| | Posted : 10 Jul 2014 - 22:46 Post title : Re: Horn Replacement with Front Dresser Bars (Re: IngerMan) | | | IngerMan wrote:
...You can take the stock horn with the new road runner bracket and accomplish the same thing with no drilling no new wires.... |
|
Your stock horn must have a longer mounting screw than mine. The mounting screw on my horn doesn't even clear the top of the vibration grommet that goes in the horn end of the roadrunner bracket.
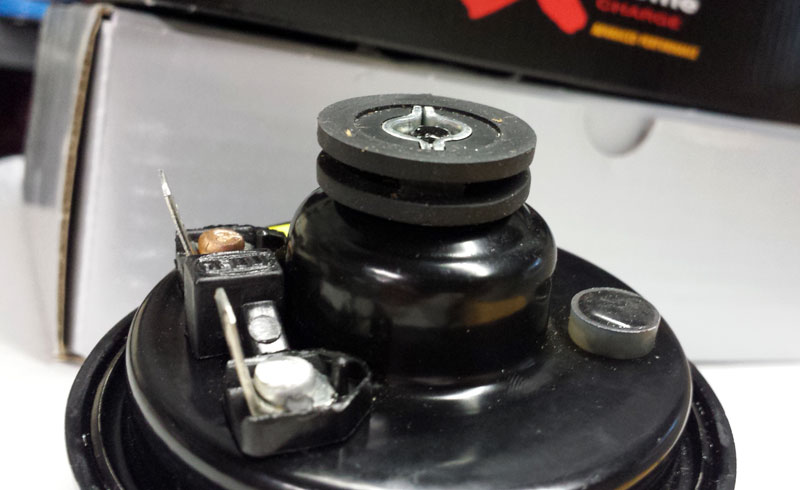
Hard to tell from your picture but if you mounted the horn without the vibration grommet through the huge hole at the end of the bracket (ref my pic of the roadrunner bracket showing the drilled hole), then I'm assuming you're counting on a washer to pin the small remaining surface area of the bracket end to the horn. IMHO, not a good mechanical solution and why I didn't do it that way. 
Drilling 1 hole and crimping 2 connectors is about 15 minutes worth of work and gives a solid mount that's not going to slip.
| 2013 Blue Marble Haze Thunderbird 1600 ABS
2009 Black Bonneville A1 ("Mag")
Buncha farkles
| | Post edited by PapaSmurfMC on 10 Jul 2014 - 22:49 |
|
| | | bschwartz | | Set | |  | | Reg. Date | : | 12/03/2014 | | Posts | : | 336 | | Location | : | Madison, Wisconsin, United States |
|
| | Posted : 11 Jul 2014 - 02:45 Post title : Re: Horn Replacement with Front Dresser Bars (Re: PapaSmurfMC) | | | I used my stock horn with the dresser bars and I used the grommet with no problems connecting everything. Not sure why your mounting screw would have been different but on my 2011 Storm it was simply a matter of using the bracket that came with the dresser bars, the mounting hardware that came with the stock horn and a little hand bending and I was off and running without the meep-meep horn. The horn doesn't touch anything and has plenty of room to vibrate to resonate. Perfectly good mechanical solution. Hasn't moved a mm since I mounted it and the screw is perfectly tight.
| | Post edited by bschwartz on 11 Jul 2014 - 02:45 |
|
| | | PapaSmurfMC | | Chaac | | | | Reg. Date | : | 03/10/2013 | | Posts | : | 871 | | Location | : | Philadelphia, Pennsylvania, United States |
|
| | Posted : 11 Jul 2014 - 03:07 Post title : Re: Horn Replacement with Front Dresser Bars (Re: bschwartz) | | |
bschwartz wrote:
I used my stock horn with the dresser bars and I used the grommet with no problems connecting everything. Not sure why your mounting screw would have been different... |
|
Yeah, that would have been nice but as you can see from my photo, not possible to use the grommet with my stock horn. Different year, different horn supplier I suppose.
| 2013 Blue Marble Haze Thunderbird 1600 ABS
2009 Black Bonneville A1 ("Mag")
Buncha farkles
|
|
|
| |
| |
|